
About iOS Provisioning and Blue Cedar
The iOS provisioning process is an Apple requirement—without it, apps that you build (or secure with Blue Cedar policies) won’t run on an iOS device. There are many ways to provision a system, depending on your setup and your development and deployment strategy.
Developers use the iOS Provisioning Portal on the Apple Developer website to create and manage the components needed for provisioning their apps. You’ll find detailed descriptions of each of these components at developer.apple.com.
To secure iOS apps with Blue Cedar, you must first enroll in Apple’s iOS Developer Enterprise Program and set up your Mac with the certificates and provisioning profiles that let you create and distribute iOS apps.
The Apple Developer website, is the ultimate resource for iOS provisioning advice. If you’re new to developing iOS apps, the tools and documentation on the Apple Developer site will guide you through the process.
iOS Provisioning for all apps
To understand how the policy console fits in, first look at the components involved in iOS provisioning when apps are built in Xcode. Provisioning is an important part of the development process for any app that will run on iOS-based devices.
Each component must sync up with the others for an app to run on an iOS device.
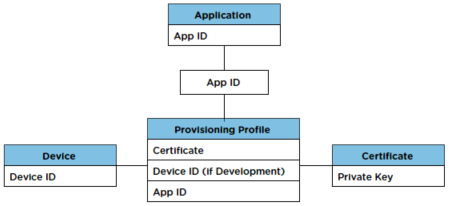
- A unique device ID is built into every iOS device. Some forms of provisioning are tied to specific devices through this device ID. Device IDs are also called a Unique Device Identifiers, or UDIDs.
- The App ID, which you create in the iOS Provisioning Portal on the Apple Developer site, is stored in both the provisioning profile and the app itself.
- Development and distribution certificates need to be installed in your keychain and Xcode before you build your app.
- A provisioning profile ties the device ID, App ID, and certificates together. You create a provisioning profile in the iOS Provisioning Portal, and then install it in Xcode before you build your app. You also install the provisioning profile on the device when you install the app. If the provisioning profile on a device is missing or if it refers to a different device ID, App ID or certificate, the app cannot run.
Provisioning Profiles
Provisioning profiles and iOS device certificates work together to enable certain features of your app. When code signing your app—either when you build it in Xcode, or after applying Blue Cedar policies—you assign a profile to the app. This profile determines where the app can run, and iOS developers need to set up and use the correct profile any time they create an app.
For example, a developer might have three profiles to choose from:
- One profile enables debugging in Xcode and running only on devices that are set up for developers on the team.
- One profile makes the app valid only on certain testing devices.
- One profile lets the IT department distribute the app to anyone in the company.
All three provisioning profiles were created in the iOS Provisioning Portal on the Apple Developer web site, and can be downloaded as .mobileprovision files. The developer installs the chosen profile in Xcode before building the app. The developer also installs that profile on each device that will run it.
Provisioning in Blue Cedar
Just as these pieces must sync up with each other when you build an app in Xcode, they must sync when you secure that app with Blue Cedar policies. Before the policy console can properly sign your iOS app, you must set up the policy console server and the app-signing server.
On the signing server:
- Install your iOS development or distribution certificate in Xcode and Keychain Access on the app-signing server.
Note: You must unlock the keychain before you can apply Blue Cedar policies to iOS apps. - Install the provisioning profile in Xcode on the app-signing server.
On the policy console:
Web interface:
- Set the bundle seed ID in the policy console. (Settings > iOS.)
- Set the provisioning profile and signing certificate in a signing profile. (See Using and configuring signing profiles.) These values let the policy console sign the app so that it can work with the provisioning profile and certificate on the signing server.
REST API:
- Set the bundle seed ID in the policy console with POST settings/ios-seed-id. The bundle seed ID is part of the App ID, a unique 10-character prefix. It lets the policy console sign the app (or export for signing) so that it works with your provisioning profile.
- Provide the provisioning profile and certificate name in the API Signing profiles when you secure apps with POST app-market/policy.