
Changing the overlay icon
By default, when apps are protected with Blue Cedar policies, users see a Blue Cedar overlay on top of the app icon. Instead of the default, you can use any PNG file as the overlay icon.
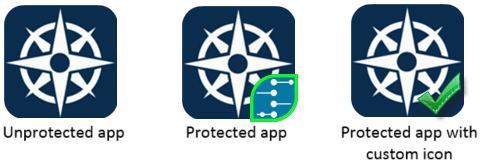
Choosing a custom icon
- The icon you upload should be a square PNG file.
- 48 x 48 pixels work well, or you can use a larger file.
- The console stretches the image to a square shape if necessary and scales the image to be 25% the size of the app icon.
- Save the file with transparency to let more of the app icon show through.
Customizing the overlay icon
In the policy console menu, click Settings.
Click All.
Under Overlay icon > Change File, click Choose File.
Browse to the new PNG file, select it, and click Open. Your new icon appears in the Overlay icon area.
Click Apply to set it as the default overlay icon.
Using no icon
Create a transparent PNG file and upload it as the custom overlay icon. The secured apps will look the same as any unprotected apps in the system.